共计 7770 个字符,预计需要花费 20 分钟才能阅读完成。
导言
为什么会有这篇文章?因为在看 MIND 的时候它就使用了胶囊网络,当时看着有点懵,所以看着论文的引用,原来是由Hinton他们提出在图像中的应用。
“Dynamic Routing Between Capsules”是由Hinton等联合发表在NIPS会议上。提出了一个新的神经网络—胶囊网络与囊间的动态路由算法。
提出这个算法是因为CNN现在有以下缺陷:
- 不具备旋转不变性 — 做图像分类的时候在图像预处理那一块都会做一些数据增强的操作,比如旋转。之前张俊林来我司将对比学习的时候,在图像对比学习的例子时举的典型的例子就是旋转。
- pooling — pooling 本身是有优点的,但是论文嘛既然写出来就是要从他的缺点出发,这个pooling会导致大量信息的丢失。
胶囊网络就是试着去解决以上提出的问题。
胶囊网络定义
以下通过原文的描述对胶囊下一些定义:
1、一个胶囊是一组神经元(「输入」),即神经元「向量」(activity vector),表示特定类型的实体(例如对象或对象部分)的实例化参数(例如可能性、方向等)。
❝A capsule is a group of neurons whose activity vector represents the instantiation parameters of a specific type of entity such as an object or an object part.
❞
2、「使用胶囊的长度(模)来表示实体(例如上述的眼睛、鼻子等)存在的概率」,并使用其 方向(orientation)来表示除了长度以外的其他实例化参数,例如位置、角度、大小等。
❝We use the length of the activity vector to represent the probability that the entity exists and its orientation to represent the instantiation parameters.
❞
❝In this paper we explore an interesting alternative which is to use the overall length of the vector of instantiation parameters to represent the existence of the entity and to force the orientation of the vector to represent the properties of the entity.
❞
3、胶囊的「向量输出」的长度(模长)不能超过1,可以通过应用一个「非线性函数」使其在方向不变的基础上,缩小其大小。
❝cannot exceed 1 by applying a non-linearity that leaves the orientation of the vector unchanged but scales down its magnitude.
❞
计算逻辑
1、低层胶囊输入
输入为较为低层次的胶囊(Primary Capsule)u_i \in R^{k*1},i=1,2,..n,其中,n 表示胶囊的个数,k 表示每个胶囊内的神经元个数(向量长度)。图中的u_1,u_2,u_3可以解释为监测到眼睛、嘴巴、鼻子三个低层次的胶囊。
2、计算预测向量(predict vector)
应用一个转换矩阵(transformation matrix)$W_{ij} \in R^{pk},p 表示输出胶囊的神经元数量,将输入u_i$转换为「预测向量」$u_{j|i}\in R^{p1}$:
u_{j|i}=W_{ij}u_i
「为什么称u_{j|i}为预测向量?」 因为转换矩阵W_{ij}是编码低层特征(眼睛、嘴和鼻子)和高层特征(脸)之间重要的空间和其他关系。
3、预测向量加权求和
然后我们需要将所有得到的预测向量进行加权求和:
s_j=\sum_{i}c_{ij}u_{j|i}
其中s_j被称为高层胶囊j总的输入,c_{ij}为权重系数,在论文中被称为耦合系数(coupling coefficients),并且\sum_{j}c_{ij}=1从概念上说,c_{ij}表示胶囊 i 激活胶囊j的概率分布,「它是通过动态路由算法进行学习」。
4、 胶囊输出
之前我们提到想要一个胶囊的向量的模来表示由胶囊所代表的实体存在的概率。因此作者在论文中提出使用非线性函数“「squashing」”来替代传统的神经网络的激活函数Relu,这是为了确保短向量可以被压缩至接近0的长度,长向量压缩至接近1的长度,「并且保持向量的方向不变」。因此最终胶囊的向量输出:
v_j=\frac{\left \Vert s_j\right \Vert^2}{1+\left \Vert s_j\right \Vert^2}\frac{s_j}{\left \Vert s_j\right \Vert}
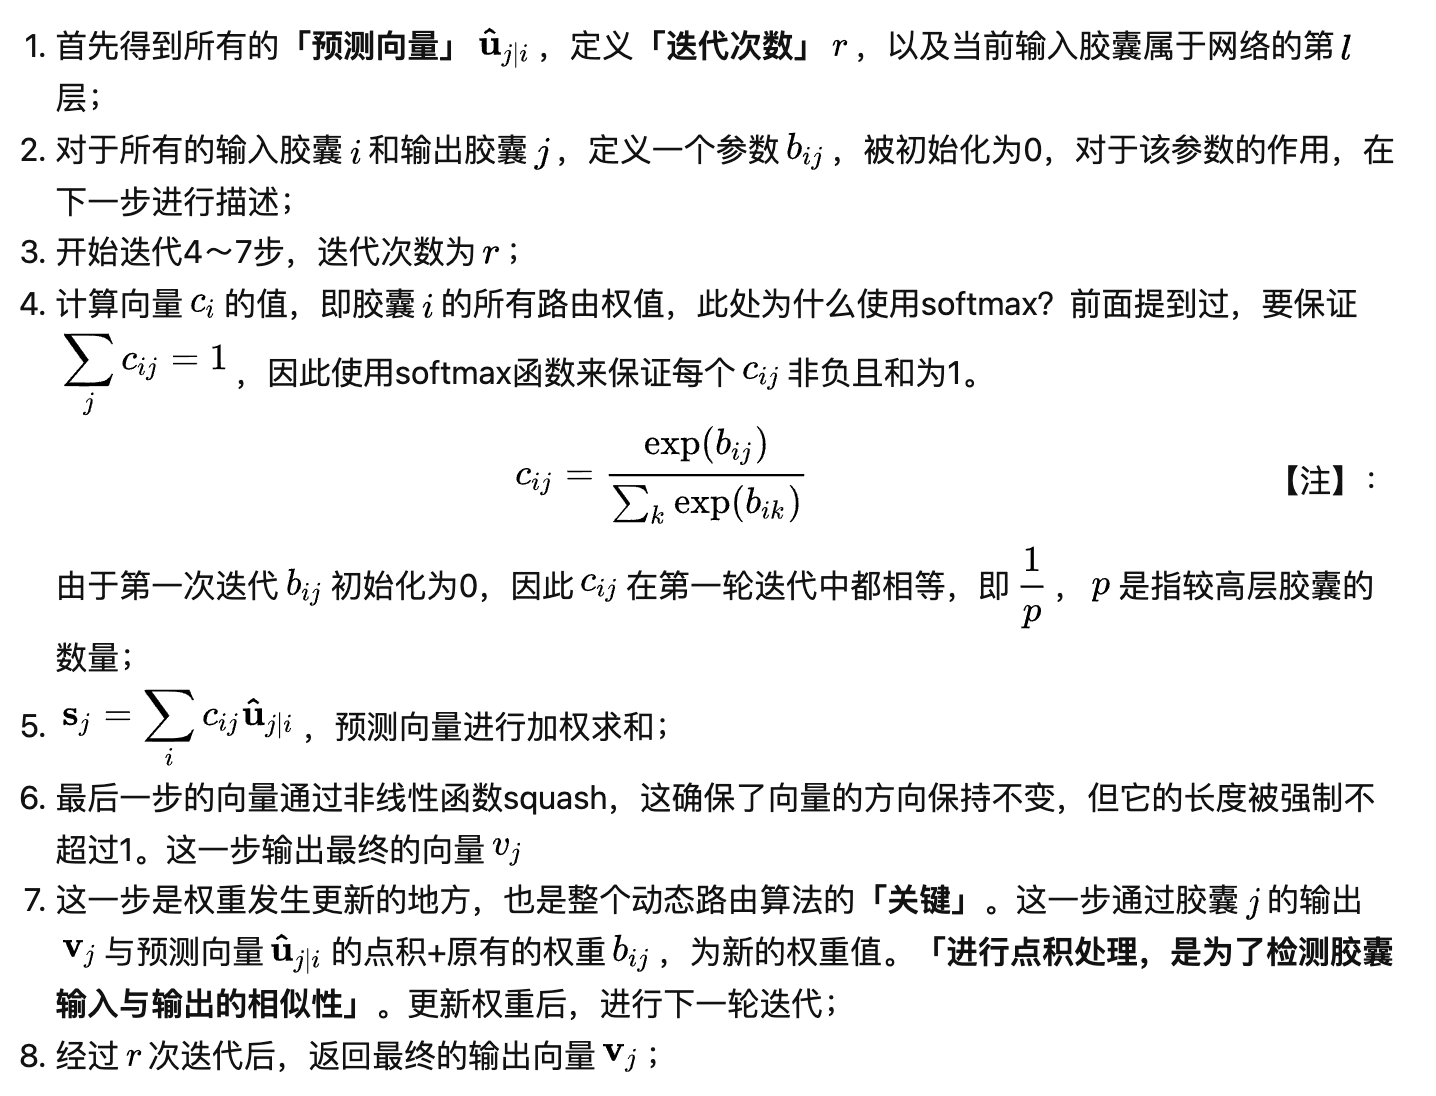
5、动态路由算法


讲解的步骤都会试着对着下面这张图来阐述胶囊网络,这里选取的数据源时 Minist手写字体数据库。

1、构建Primary Capsule 胶囊网络的输入 — 对于给定的图片使用 256 个 9*9 的模版进行卷积操作
x = layers.Input(shape=input_shape, batch_size=batch_size) # [None,28,28,1]
# Layer 1: Just a conventional Conv2D layer ,output shape [None ,20,20,256]
conv1 = layers.Conv2D(filters=256, kernel_size=9, strides=1, padding='valid', activation='relu', name='conv1')(x)
2、生成 Primary Capsule 也是所谓的 Low-level-capsule 这些capsule 包含一些基础的信息,可以理解为数字的一些底层特征的提取过程。
下面的代码就是说明底层胶囊的输出
def squash(vectors, axis=-1):
    """
    The non-linear activation used in Capsule. It drives the length of a large vector to near 1 and small vector to 0
    :param vectors: some vectors to be squashed, N-dim tensor
    :param axis: the axis to squash
    :return: a Tensor with same shape as input vectors
    """
    s_squared_norm = tf.reduce_sum(tf.square(vectors), axis, keepdims=True)
    scale = s_squared_norm / (1 + s_squared_norm) / tf.sqrt(s_squared_norm + K.epsilon())
    return scale * vectors
def PrimaryCap(inputs, dim_capsule, n_channels, kernel_size, strides, padding):
    """
    Apply Conv2D `n_channels` times and concatenate all capsules
    :param inputs: 4D tensor, shape=[None, width, height, channels]
    :param dim_capsule: the dim of the output vector of capsule 胶囊向量输出的维度
    :param n_channels: the number of types of capsules 胶囊的个数
    :return: output tensor, shape=[None, num_capsule, dim_capsule]
    """
    #  convolutional capsule layer with 32 channels of convolutional 8D capsules
    output = layers.Conv2D(filters=dim_capsule*n_channels, kernel_size=kernel_size, strides=strides, padding=padding,
                           name='primarycap_conv2d')(inputs)
    outputs = layers.Reshape(target_shape=[-1, dim_capsule], name='primarycap_reshape')(output)
    return layers.Lambda(squash, name='primarycap_squash')(outputs)
# 胶囊向量的维度是 8 胶囊的个数是 32    primarycaps  shape [None,1152=(32*6*6),8]
primarycaps = PrimaryCap(conv1, dim_capsule=8, n_channels=32, kernel_size=9, strides=2, padding='valid')
3、胶囊网络输出 Digital caps
class CapsuleLayer(layers.Layer):
    """
    The capsule layer. It is similar to Dense layer. Dense layer has `in_num` inputs, each is a scalar, the output of the
    neuron from the former layer, and it has `out_num` output neurons. CapsuleLayer just expand the output of the neuron
    from scalar to vector. So its input shape = [None, input_num_capsule, input_dim_capsule] and output shape = \
    [None, num_capsule, dim_capsule]. For Dense Layer, input_dim_capsule = dim_capsule = 1.

    :param num_capsule: number of capsules in this layer
    :param dim_capsule: dimension of the output vectors of the capsules in this layer
    :param routings: number of iterations for the routing algorithm
    """
    def __init__(self, num_capsule, dim_capsule, routings=3,
                 kernel_initializer='glorot_uniform',
                 **kwargs):
        super(CapsuleLayer, self).__init__(**kwargs)
        self.num_capsule = num_capsule
        self.dim_capsule = dim_capsule
        self.routings = routings
        self.kernel_initializer = initializers.get(kernel_initializer)

    def build(self, input_shape):
        assert len(input_shape) >= 3, "The input Tensor should have shape=[None, input_num_capsule, input_dim_capsule]"
        self.input_num_capsule = input_shape[1]
        self.input_dim_capsule = input_shape[2]

        # Transform matrix, from each input capsule to each output capsule, there's a unique weight as in Dense layer.
        self.W = self.add_weight(shape=[self.num_capsule, self.input_num_capsule,
                                        self.dim_capsule, self.input_dim_capsule],
                                 initializer=self.kernel_initializer,
                                 name='W')

        self.built = True

    def call(self, inputs, training=None):
        # inputs.shape=[None, input_num_capsule, input_dim_capsule]
        # inputs_expand.shape=[None, 1, input_num_capsule, input_dim_capsule, 1]
        inputs_expand = tf.expand_dims(tf.expand_dims(inputs, 1), -1)

        # Replicate num_capsule dimension to prepare being multiplied by W
        # inputs_tiled.shape=[None, num_capsule, input_num_capsule, input_dim_capsule, 1]
        inputs_tiled = tf.tile(inputs_expand, [1, self.num_capsule, 1, 1, 1])

        # Compute `inputs * W` by scanning inputs_tiled on dimension 0.
        # W.shape=[num_capsule, input_num_capsule, dim_capsule, input_dim_capsule]
        # x.shape=[num_capsule, input_num_capsule, input_dim_capsule, 1]
        # Regard the first two dimensions as `batch` dimension, then
        # matmul(W, x): [..., dim_capsule, input_dim_capsule] x [..., input_dim_capsule, 1] -> [..., dim_capsule, 1].
        # inputs_hat.shape = [None, num_capsule, input_num_capsule, dim_capsule]
        inputs_hat = tf.squeeze(tf.map_fn(lambda x: tf.matmul(self.W, x), elems=inputs_tiled))

        # Begin: Routing algorithm ---------------------------------------------------------------------#
        # The prior for coupling coefficient, initialized as zeros.
        # b.shape = [None, self.num_capsule, 1, self.input_num_capsule].
        b = tf.zeros(shape=[inputs.shape[0], self.num_capsule, 1, self.input_num_capsule])

        assert self.routings > 0, 'The routings should be > 0.'
        for i in range(self.routings):
            # c.shape=[batch_size, num_capsule, 1, input_num_capsule]
            c = tf.nn.softmax(b, axis=1)

            # c.shape = [batch_size, num_capsule, 1, input_num_capsule]
            # inputs_hat.shape=[None, num_capsule, input_num_capsule, dim_capsule]
            # The first two dimensions as `batch` dimension,
            # then matmal: [..., 1, input_num_capsule] x [..., input_num_capsule, dim_capsule] -> [..., 1, dim_capsule].
            # outputs.shape=[None, num_capsule, 1, dim_capsule]
            outputs = squash(tf.matmul(c, inputs_hat))  # [None, 10, 1, 16]

            if i < self.routings - 1:
                # outputs.shape =  [None, num_capsule, 1, dim_capsule]
                # inputs_hat.shape=[None, num_capsule, input_num_capsule, dim_capsule]
                # The first two dimensions as `batch` dimension, then
                # matmal:[..., 1, dim_capsule] x [..., input_num_capsule, dim_capsule]^T -> [..., 1, input_num_capsule].
                # b.shape=[batch_size, num_capsule, 1, input_num_capsule]
                b += tf.matmul(outputs, inputs_hat, transpose_b=True)
        # End: Routing algorithm -----------------------------------------------------------------------#

        return tf.squeeze(outputs)

    def compute_output_shape(self, input_shape):
        return tuple([None, self.num_capsule, self.dim_capsule])

    def get_config(self):
        config = {
            'num_capsule': self.num_capsule,
            'dim_capsule': self.dim_capsule,
            'routings': self.routings
        }
        base_config = super(CapsuleLayer, self).get_config()
        return dict(list(base_config.items()) + list(config.items()))
# Layer 3: Capsule layer. Routing algorithm works here. 输出 [None 10 16 ]
digitcaps = CapsuleLayer(num_capsule=n_class, dim_capsule=16, routings=routings, name='digitcaps')(primarycaps)
参考:
- https://zhuanlan.zhihu.com/p/184928582
- https://github.com/XifengGuo/CapsNet-Keras/tree/tf2.2


